ADVERTISEMENT
Homemade Brownie Mix
Prep Time: 5 minutes
Bake Time: 22 minutes
Total Time: 27 minutes
Yield: 9 decadent brownies
Discover the secret to creating bakery-quality brownies right in your own kitchen! This exceptional recipe delivers everything you could want in the perfect brownie—a delicate, flaky crust on top, a rich chewy center, and intense chocolate flavor in every bite. Best of all, it comes together with simple pantry staples in just one bowl, giving you all the convenience of a boxed mix without any artificial additives or preservatives.
Why This Recipe Will Become Your Favorite
For anyone who appreciates consistently excellent brownies, this recipe hits every mark. The texture achieves that ideal balance—never dry or cakey, but wonderfully moist and fudgy. The flaky top crust provides a satisfying contrast to the chewy interior, while the deep chocolate flavor shines through without being overwhelming.
The simplicity factor cannot be overstated. When you crave fresh brownies but want minimal fuss, this recipe delivers. Everything goes into a single bowl with straightforward mixing—no complicated techniques or special equipment required. It’s the kind of recipe that gives you confidence every single time.
Endless Customization Possibilities
While these brownies are absolutely delicious as written, they serve as a wonderful canvas for your creativity. The base recipe welcomes all sorts of additions and adaptations without compromising its excellent texture or flavor.
Mix-In Ideas:
Chocolate lovers can fold in various chips—milk chocolate, dark chocolate, white chocolate, peanut butter, or butterscotch morsels. Use between half a cup and three-quarters of a cup total for best results.
Nut enthusiasts will find that adding roughly three-quarters of a cup of chopped walnuts, pecans, or almonds brings wonderful texture and flavor.
For extra indulgence, drizzle Nutella over the batter once it’s in the pan, then swirl it decoratively with a knife for a marbled effect.
Cookie pieces add fun and flavor—roughly chop Oreos or your favorite cookies and either press them into the top or fold about one cup into the batter itself.
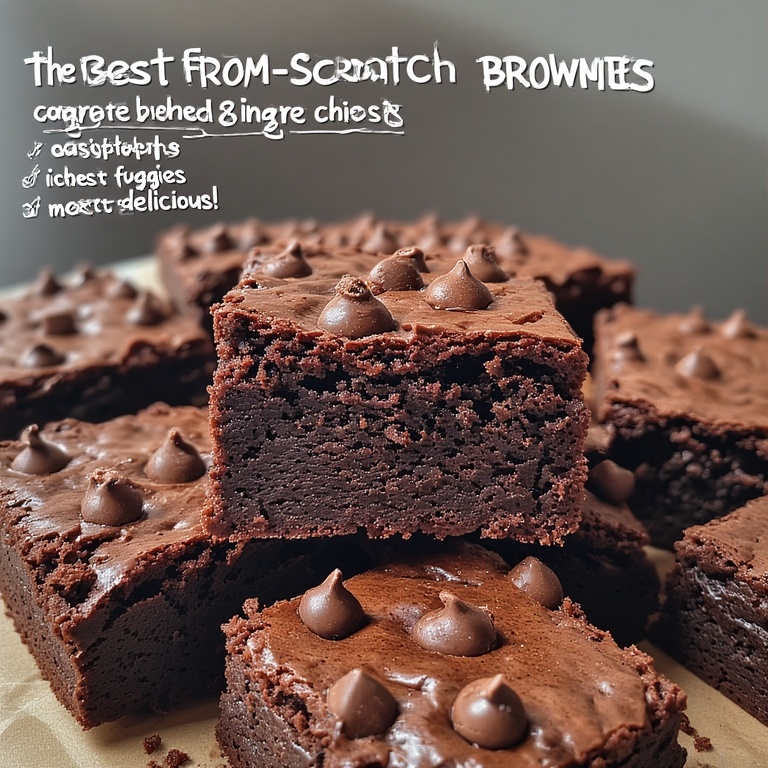
The photograph at the beginning of this article features brownies with chocolate chips mixed throughout the batter, plus a few extra scattered on top immediately after removing them from the oven—a technique that creates beautiful melted chocolate pools.
Gluten-Free Adaptation
While not personally tested in this kitchen, numerous home bakers have reported excellent success substituting a high-quality one-to-one gluten-free flour blend for the all-purpose flour. Choose a blend specifically designed for baking, as these typically contain the right combination of starches and binders to mimic traditional flour’s properties.
About Adding Coffee
This particular recipe does not include coffee, keeping the focus purely on chocolate flavor. However, adding coffee or espresso powder is a beloved baker’s trick for intensifying chocolate taste. The coffee doesn’t make brownies taste like coffee—instead, it acts as a flavor enhancer that makes chocolate taste more chocolatey. If you’d like to experiment with this technique, instant espresso powder works beautifully. Standard instant coffee can substitute in a pinch, though espresso powder provides more concentrated flavor.
Perfect Frosting Pairing
These brownies are wonderful on their own, but they become absolutely extraordinary when topped with the right frosting. A rich chocolate frosting featuring a secret ingredient complements these brownies perfectly, taking them from everyday treat to special occasion dessert. The same frosting works beautifully on double fudge brownies as well.
Storage and Freezing Guidelines
The Dry Mix: When gifting this recipe as a mix, combine all the dry ingredients and transfer them to an airtight jar or container. The mix stays fresh in your pantry for up to six months, or until the earliest expiration date of your ingredients. Include a gift tag with the wet ingredients list and complete instructions.
Baked Brownies: Once baked, these brownies maintain optimal texture and flavor for approximately two days when stored in an airtight container at room temperature. Keep them covered to preserve moisture and prevent them from drying out.
Freezing Baked Brownies: For longer storage, brownies freeze exceptionally well. Begin by wrapping them tightly in plastic wrap, ensuring all surfaces are covered. Then place the wrapped brownies into a freezer-safe container, heavy-duty freezer bag, or wrap them again with aluminum foil for extra protection against freezer burn. Always label with the date so you know when you froze them.
When you’re ready to enjoy your frozen brownies, transfer them from the freezer to your refrigerator and let them thaw overnight. Alternatively, you can leave them on the counter to come to room temperature naturally. This gradual thawing helps maintain their wonderful texture.
Achieving Extra Gooey Brownies
For those who prefer an especially moist, almost undercooked center, try removing your brownies from the oven five to seven minutes before the recommended baking time ends. This technique creates an intensely fudgy texture with that coveted gooey quality. However, this approach isn’t recommended for anyone who prefers fully cooked batter or has concerns about consuming slightly underbaked goods. If you’re seeking that ultra-decadent, molten brownie experience, though, this method delivers spectacular results.
Complete Recipe Instructions
Dry Ingredients:
- 1 cup (200g) granulated sugar
- ⅓ cup (40g) unsweetened cocoa powder, sifted to remove lumps
- ½ cup (64g) all-purpose flour
- ¼ teaspoon kosher salt
- ¼ teaspoon baking powder
Wet Ingredients:
- ½ cup (1 stick or 113g) unsalted butter, melted then cooled
- 2 large eggs, brought to room temperature
- 1 teaspoon pure vanilla extract
Directions:
Preparation: Position your oven rack in the center and preheat to 350°F (175°C). Prepare an 8×8-inch baking pan by coating it thoroughly with non-stick cooking spray or lining it with parchment paper for easy removal.
Mix Dry Ingredients: In a large mixing bowl, combine the granulated sugar, sifted cocoa powder, all-purpose flour, salt, and baking powder. Sifting the cocoa powder beforehand prevents lumps in your final brownies. If you don’t have a sifter, whisking these ingredients vigorously accomplishes the same goal.
Prepare Butter: Melt your butter using your preferred method—stovetop or microwave both work well. Once melted, set it aside to cool slightly. Using butter that’s too hot can cook the eggs prematurely when you add them, creating an undesirable texture.
Combine Wet Ingredients: In a separate medium bowl, beat together the eggs and vanilla extract using a hand-held mixer. Beating them until well combined helps create that desirable flaky top crust.
Bring It Together: Pour the egg mixture and the melted (but cooled) butter into your bowl of dry ingredients. Stir gently until everything just comes together. Avoid overmixing at this stage—you want to see the ingredients combined, but you don’t need to beat it smooth. A few small lumps are perfectly fine and actually preferable to an overworked batter.
Bake: Transfer the batter into your prepared pan, spreading it evenly to the edges. Place in your preheated oven and bake for 20 to 22 minutes. The brownies are done when a toothpick inserted into the center comes out with just a few moist crumbs—not wet batter, but not completely clean either.
Cool and Serve: Allow the brownies to cool in the pan before cutting. This gives them time to set properly, making them much easier to slice cleanly.
Gifting the Mix
This recipe makes a thoughtful and delicious gift when packaged attractively. Sift together all the dry ingredients as listed above, then transfer the mixture to a decorative jar or container with a tight seal.
Create a gift tag or attractive label that includes the following information:
Wet Ingredients Needed:
- ½ cup melted butter (cooled slightly)
- 2 large eggs
- 1 teaspoon vanilla extract
Instructions: “Preheat your oven to 350°F. Melt the butter and allow it to cool. Beat the eggs and vanilla together in a medium bowl. Add the dry mix from this jar and stir until combined. Pour in the melted butter and mix until just incorporated—don’t overmix! Spread the batter into a greased 8-inch square pan. Bake for 20-22 minutes. Allow to cool before cutting into squares. Enjoy!”
Nutritional Information (Per Brownie)
Calories: 226
Serving Size: 1 brownie (recipe makes 9)
Final Thoughts
This homemade brownie recipe proves that the best desserts often come from the simplest ingredients and straightforward techniques. You don’t need specialty equipment, unusual ingredients, or professional training to create brownies that rival anything from a high-end bakery. The key lies in quality ingredients, proper mixing, and precise baking time.
Whether you’re baking for a special occasion, preparing a thoughtful gift, or simply satisfying a chocolate craving on a random Tuesday evening, this recipe delivers consistent excellence. The texture, flavor, and ease of preparation make it a recipe you’ll return to again and again. Once you experience how straightforward truly great brownies can be, you’ll wonder why you ever reached for a boxed mix.
Make a batch today and discover why so many home bakers consider this their go-to brownie recipe. Your kitchen will smell incredible, and your first bite will confirm that homemade really is better!
ADVERTISEMENT
