ADVERTISEMENT
Magic Custard Cake: The Enchanting Dessert That Bakes Itself
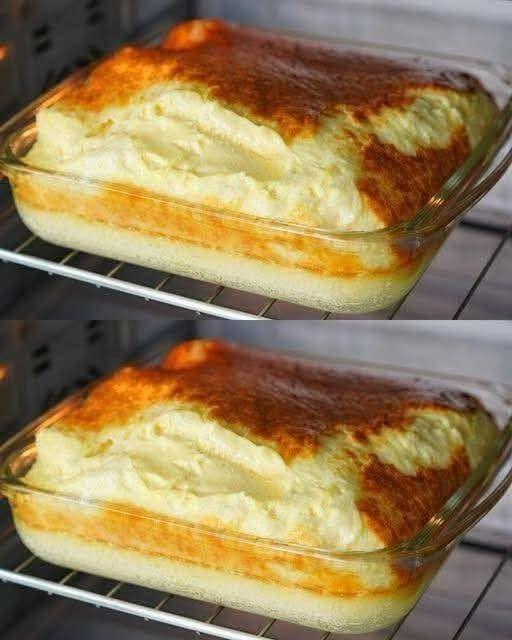
Few desserts capture the imagination quite like Magic Custard Cake. With its seemingly magical ability to transform from a simple batter into three distinct layers—a soft, delicate custard at the bottom, a creamy middle, and a light, airy sponge on top—this cake is a wonder in the world of baking. Elegant enough for special occasions but simple enough for a weekend treat, Magic Custard Cake is the dessert that impresses every time.
In this comprehensive guide, we’ll explore the origins of this mesmerizing dessert, the ingredients that make it shine, step-by-step instructions for creating it at home, tips for perfect results, variations, and serving suggestions. By the end, you’ll understand why this cake has become a favorite among home bakers and dessert lovers around the globe.
A Glimpse into the Origins of Magic Custard Cake
Magic Custard Cake, also known as “Magic Cake,” originated in Europe, particularly in France, where the concept of “gâteau magique” first appeared. The term translates literally to “magic cake” and refers to its unique ability to form multiple textures from a single batter during baking.
The phenomenon occurs due to the separation of ingredients during baking: the batter’s liquid custard settles at the bottom, eggs and sugar create the creamy middle layer, and the whipped egg whites form a light, airy sponge on top.
Over the years, this cake has spread worldwide, gaining popularity through baking blogs, social media, and YouTube tutorials. Its allure lies in its simplicity—minimal ingredients and no complicated steps, yet the result feels luxurious and sophisticated.
Why Magic Custard Cake Is So Special
Magic Custard Cake is beloved for several reasons:
- Three Layers from One Batter: Bottom custard, creamy middle, and fluffy sponge on top.
- Elegant Appearance: A beautifully layered cake that looks like a professional bake.
- Minimal Ingredients: Pantry staples often suffice.
- No Special Equipment Needed: Just a mixing bowl, whisk, and oven.
- Versatile: Can be flavored with vanilla, chocolate, lemon, or other extracts.
The “wow factor” comes naturally, making it perfect for impressing guests without stress.
Essential Ingredients for Magic Custard Cake
To create a flawless Magic Custard Cake, quality and accurate measurements are key.
Core Ingredients
- Eggs: Provide structure and separate into whites and yolks for the distinct layers.
- Milk: Whole milk is preferred for creaminess.
- Butter: Melted, adds richness and flavor.
- Sugar: Granulated sugar for sweetness.
- Flour: All-purpose flour for structure.
- Vanilla Extract: Adds depth to the flavor.
- Salt: Enhances taste and balances sweetness.
Optional Enhancements
- Lemon zest or orange zest for a citrus twist
- Cocoa powder for chocolate magic cake
- Powdered sugar for dusting
- Fresh berries for garnish
Step-by-Step Guide to Baking Magic Custard Cake
Creating Magic Custard Cake may seem daunting, but following these steps ensures success:
Step 1: Prepare Your Ingredients
- Separate egg whites from yolks.
- Measure milk, sugar, butter, and flour.
- Preheat the oven to 160°C (320°F).
- Grease and line a baking pan with parchment paper.
Step 2: Make the Base Batter
- In a bowl, whisk together egg yolks and sugar until pale and creamy.
- Add melted butter and vanilla extract, mix until combined.
- Gradually sift in flour and a pinch of salt.
- Slowly incorporate milk, whisking until smooth.
Step 3: Whip the Egg Whites
- In a separate bowl, beat egg whites until stiff peaks form.
- Gently fold egg whites into the yolk mixture in three parts, maintaining the airiness.
Step 4: Bake
- Pour batter into the prepared pan.
- Bake in a preheated oven at 160°C (320°F) for 50–60 minutes.
- The top should be golden and firm, while the center remains slightly wobbly.
Step 5: Cool and Set
- Allow the cake to cool completely in the pan for 1–2 hours.
- Refrigerate for at least 2 hours to let the layers set.
Step 6: Serve
- Dust with powdered sugar.
- Optional: Garnish with fresh berries, chocolate shavings, or whipped cream.
- Slice carefully to showcase the three distinct layers.
ADVERTISEMENT
